Utils
内容模板
有时我们需要使用一些拥有特定格式的文字内容,例如发送短信,发送邮件的时候,需要使用经过排版的文字。weroll/utils/TemplateLib 提供了使用文字内容模板的功能,开发者可以将文字排版后存放在单独的文件中做成模板,在使用时加载模板,并将占位符替换为实际的变量值。具体使用方法如下:
在 ./server/res/template 目录中,创建模板分组目录,如sms和mail:
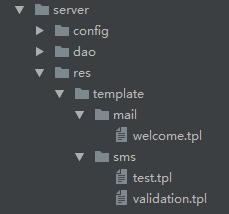
在相应的分组目录中,开发者可以创建针对某一业务需求所要使用的内容模板文件,如新用户注册的欢迎邮件,模板文件名为welcome.tpl,内容如下:
Welcome %name%
**********%*********
Hi %name%,<br>
Welcome to be our member!
<br>
<br>
<p style="font-size:12px; color:#666;">This email is sent by system automatically. Please do not reply it.</p>
<br>
%site%
%date%
模板内容由 title 和 content 两部分组成,title或content都可以为空,模板中 %XXX% 表示变量占位符:
This is title
**********%*********
This is content, %arg0%, %arg1%
使用 TemplateLib.useTemplate 加载模板文件和替换变量值:
TemplateLib.useTemplate(GROUP, TEMPLATE_FILE_NAME, VARS);
var TemplateLib = require("weroll/utils/TemplateLib");

var template = TemplateLib.useTemplate("mail", "welcome", { site:"My WebSite", name:"Jay" });
console.log(template.title);   //echo "Welcome Jay"
console.log(template.content);   //echo content...
如果模板内容中经常用到某一个变量值,如网站的网址,网站的名称等,可以使用 TemplateLib.init() 方法预先设定变量值,如:
TemplateLib.init({ site:"My WebSite", siteDomain:"http://www.magicfish.cn/" });

/* ./server/res/template/mail/test.tpl
This is title
**********%*********
This is content: <a href="siteDomain" target="_blank">%site%</a>
*/

var template = TemplateLib.useTemplate("mail", "test");
console.log(template.content);
//echo 'This is content: <a href="http://www.magicfish.cn/" target="_blank">My WebSite</a>'
发送手机短信
使用 weroll/utils/SMSUtil 可以实现手机短信发送服务。开发者可以根据实际合作的短信发送服务提供商所提供的接口,自定义短信发送的业务代码。
注意: 使用SMSUtil需要开启redis服务.
SMSUtil使用方法如下:
var SMSUtil = require("weroll/utils/SMSUtil");

/* initialize */
var config = {
    limit: {
        duration:60 * 1000,   //对同一个手机发送短信的最小时间间隔
        maxPerDay:99          //对同一个手机一天内最多发送的短信次数
    },
    simulate:true,   //是否开启模拟发送短信, true则表示不会真的使用短信发送服务
    debug:true       //是否开启DEBUG模式,开启则会在终端打印一些日志信息,默认使用global.VARS.debug
};
SMSUtil.init(config);

/* custom SMS service */
var MyProxy = {};
MyProxy.send = function(phone, msg, option, callBack) {
    return new Promise(function(resolve, reject) {
        //your codes
        console.log("send SMS to phone: ", phone);
        if (callBack) return callBack();
        resolve();
    });
};
SMSUtil.setProxy(MyProxy);

/* send with callBack */
SMSUtil.send("18600000000", "Hi Jay, welcome to be our member!", function(err) {
    err && console.error(err);
});

/* send with promise */
SMSUtil.send("18600000000", "Hi Jay, welcome to be our member!").
then(function() {
    //send completed
}).
catch(function(err) {
    err && console.error(err);
});

/* send with async & await */
async function() {
    await SMSUtil.send("18600000000", "Hi Jay, welcome to be our member!");
}

/* enforce send */
SMSUtil.send("18600000000", "Hello again!", { enforce:true });

/* send with template*/
//使用 ./server/res/template/sms/%模板名% 模板文件作为短信内容进行发送
SMSUtil.sendWithTemplate("18600000000", "test", { name:"Jay" }, { enforce:true });
手机验证码
在开发互联网应用时,我们经常需要发送手机短信验证码,如新用户注册,用户找回密码等业务场景,使用 weroll/utils/PhoneValidationCode 可以实现手机短信验证码功能。
注意: 使用PhoneValidationCode需要开启redis服务.
PhoneValidationCode 依赖 TemplateLib 和 SMSUtil,在使用前需要先初始化这2个依赖库,示例代码如下:
/* init SMSUtil */
var config = {
    limit: {
        duration:60 * 1000,   //milli sec
        maxPerDay:99
    }
};
SMSUtil.init(config);

/* custom SMS service */
var MyProxy = {};
MyProxy.send = function(phone, msg, option, callBack) {
    return new Promise(function(resolve, reject) {
        //your codes
        console.log("send SMS to phone: ", phone);
        if (callBack) return callBack();
        resolve();
    });
};
SMSUtil.setProxy(MyProxy);

/* init TemplateLib */
TemplateLib.init({ site:"My WebSite" });

/* init PhoneValidationCode */
PhoneValidationCode.init();
PhoneValidationCode.init([option]) 可以设置一些默认参数, 参数列表如下:
| Option | Description |
| len | 验证码长度,默认是6位 |
| pattern | 验证码生成规则,默认是纯数字。也可以定义以下的规则: |
| simulate | true/false, 是否开启模拟发送短信。默认是false. |
| debug | true/false, 是否开启DEBUG模式。默认使用global.VARS.debug. |
| expire | 验证码默认的失效时间, 单位是秒, 默认是15分钟. 也可以在调用send()方法时, 使用expire参数来单独指定某一次验证码的失效时间. |
使用 PhoneValidationCode.send() 方法发送验证码:
PhoneValidationCode.send(phone, group, [option], [callback]);
| Option | Description |
| phone | 发送目标的手机号码 |
| group | 验证码类型,由开发者自由定义,如register表示用于注册的验证码,pwd表示用于找回密码。同一类型验证码将受到最小发送时间间隔的限制。 |
| option | 可选参数 |
| callback | 可选,回调方法,返回err和code。code表示生成的验证码。 |
注意:可选参数中template默认使用 validation.tpl 内容模板,在使用 PhoneValidationCode.send() 之前请先创建内容模板,如:
**********%*********
validation code: %code%
title可为空,%code% 表示验证码占位符. 详细使用模板请参考 - 内容模板.
PhoneValidationCode完整的API如下:
| Method | Description |
| init() | |
| send() | |
| check() | callback返回Error和一个布尔值, 表示是否匹配, true表示匹配. |
| use() | callback返回Error和一个布尔值, 表示是否匹配, true表示匹配. |
| remove() | |
完整的示例代码如下:
async function() {
    var phone = "18600000000";

    //send validation code for user registration
    var code = await PhoneValidationCode.send(phone, "register", { template:"register_code_sms" });

    //check validation code
    var isMatch = await PhoneValidationCode.use(phone, "register", code);
    if (isMatch) {
        //match
        //make success response to user
    } else {
        //not match
        //make fail response to user
    }
}
发送邮件
使用 weroll/utils/MailUtil 可以实现邮件发送服务。
MailUtil使用方法如下:
var MailUtil = require("weroll/utils/MailUtil");

/* initialize */
var config = {
    //邮箱smtp服务配置
    smtp:{
        user:"developer@magicfish.cn",
        password:"xxxxxxxxx",
        host:"smtp.xxxx.com",
        port:465,
        ssl:true
    },
    sender:"developer@magicfish.cn",  //写信人的邮箱
    senderName:"Robot", //写信人的名字
    simulate:true,   //是否开启模拟发送模式
    debug:true    //是否开启DEBUG模式,默认使用global.VARS.debug
};
MailUtil.init(config);

/* send with callBack */
MailUtil.send("xxxxxx@qq.com", "Hello", "Hi Tracy,\r\nWelcome...", function(err) {
    err && console.error(err);
});

/* send with promise */
MailUtil.send("xxxxxx@qq.com", "Hello", "Hi Tracy,\r\nWelcome...").
then(function() {
    //do something
}).
catch(function(err) {
    console.error(err);
});

/* send with async & await */
async function() {
    await MailUtil.send("xxxxxx@qq.com", "Hello", "Hi Tracy,\r\nWelcome...");
}

/* send html */
var content = {
    plain: "Hi Tracy,\r\nWelcome...",
    html: "Hi Tracy,<br><h1>Welcome</h1>"
};
MailUtil.send("xxxxxx@qq.com", "Hello", content);
MailUtil默认使用 emailjs 来发送邮件, MailUtil.init() 初始化参数请参考emailjs的文档.
MailUtil同样可以使用内容模板作为邮件的正文和标题来发送邮件:
MailUtil.sendWithTemplate(mailto, template, args, [option], [callback])
| Argument | Description |
| mailto | 收件人的邮箱地址, 多个收件人用逗号分隔 |
| template | 模板文件的文件名, 如welcome, 那么MailUtil将自动使用 ./server/res/template/mail/welcome.tpl 这个模板文件; 如果存在 welcome.html.tpl 模板文件, MailUtil则自动使用它作为html格式的邮件正文. |
| args | 内容模板的变量值, 如 { name:"Jay" }, 则替换模板中的 %name% 占位符. |
| option | [可选] 配置参数, 默认没有用处, 当开发者自定义邮件发送代码时, 可以用来实现一些特殊的需求. |
| callback | [可选] 回调函数, 返回Error对象. |
具体使用示例如下:
/* ./server/res/template/mail/welcome.tpl */
Welcome %name%
**********%*********
This is test template.
site: %site%   name: %name%
/* ./server/res/template/mail/welcome.html.tpl */
Welcome %name%
**********%*********
This is test template.
<br>
<h1>site: %site%   name: %name%</h1>
/* your code */
//send html using template
async function() {
    await MailUtil.sendWithTemplate("xxxxxx@qq.com", "welcome", { name:Jay });
}
在实际使用中, 邮件发送可能受制于网络或者邮件服务器设置, 导致邮件发送异常. 开发者可以尝试使用其他的邮件发送库来替换默认的emailjs库, 我们以 nodemailer 库为例:
var nodemailer = require('nodemailer');

/* step 1 : define custom proxy */
var MyProxy = {};
MyProxy.init = function(config) {
    MyProxy.$transporter = nodemailer.createTransport(config.stmp);
}
MyProxy.send = function(from, to, title, plainText, htmlText, option, callBack) {
   return new Promise(function(resolve, reject) {
       var mailOpt = {
           from: from,      // sender address
           to: to,          // list of receivers
           subject: title,  // subject line
           text: plainText, // plaintext body
           html: htmlText   // html body
       };

       MyProxy.$transporter.sendMail(mailOpt, function(err){
           if (err) {
               console.error('sent result error: ', err);
               if (callBack) return callBack(err);
               return reject(err);
           }
           if (callBack) return callBack();
           return resolve();
       });
   });
}
//register proxy
MailUtil.setProxy(MyProxy);


/* step 2 : initialize */
var config = {
    //邮箱smtp服务配置
    smtp:{
        host: 'smtp.xxxx.com',
        port: 465,
        secure: true, // use SSL
        auth: {
            user: 'developer@magicfish.cn',
            pass: 'xxxxxxx'
        }
    },
    sender:"developer@magicfish.cn",  //写信人的邮箱
    senderName:"Developer", //写信人的名字
    simulate:true,   //是否开启模拟发送模式
    debug:true    //是否开启DEBUG模式,默认使用global.VARS.debug
};
MailUtil.init(config);

//send like before but now we are using nodemailer
async function() {
    await MailUtil.sendWithTemplate("xxxxxx@qq.com", "welcome", { name:Jay });
}